Lavilla theme documentation
If you have any questions that are beyond the scope of this documentation, please feel free to email us via the contact page here.
Getting started
Here are the steps you should follow before you begin to edit the content of your site:
- Install the theme
- Unlock Lavilla menus by validating your Lavilla licence
- Install HBook plugin which is bundled to Lavilla (standalone plugin).
- Unlock HBook menus by validating your HBook licence
- Load the demo content if you wish to start editing from there
Theme installation
There are 2 ways to install a WordPress theme:Using the WordPress installer
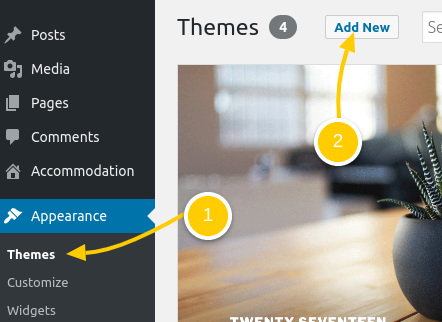
- Go to Appearance > Themes
- Click Add new
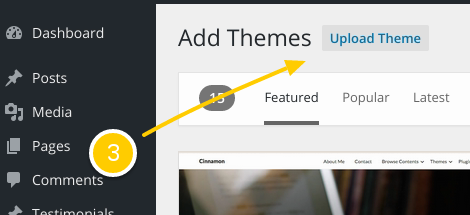
- Click Upload the zip of the theme that you will have downloaded from the link provided in the email.
- Click Choose file and select the lavilla.zip file
- Click Install now
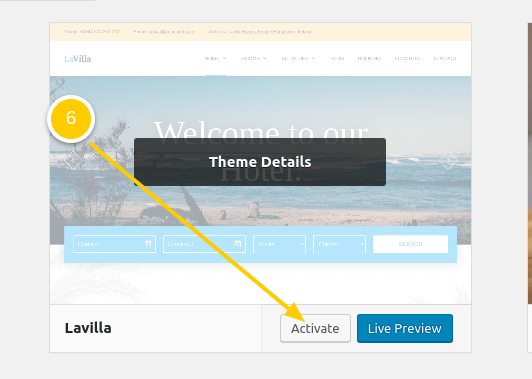
- Once the theme has been installed click Activate Theme

Uploading the theme via FTP
- Upload the lavilla.zip folder into the wp-content/themes/ folder on your server
- Extract the lavilla.zip file
- Once the theme is uploaded log into WordPress and go to Appearance > Themes. Find the Lavilla theme and click Activate

Child theme
- Use of child theme
If you don't plan to make any CSS/HTML/PHP customizations, you don't need to create a child theme.
If you want to customize Lavilla theme, you should create a child theme, o you can modify the child theme without editing the files of the parent theme itself. That way, when the parent theme is updated, your modifications are preserved. For this reason, child themes are the recommended way of making modifications to a theme. - Creating a child
Lavilla theme comes with a pre-made child theme. You can download it here. You will just have to install the lavilla-child.zip file or lavilla-child/ folder as if it was a theme (use the WordPress auto-installer or a FTP software).
Now, to customize the theme, just edit the child theme and when you upgrade the theme, just overwrite the parent theme and there's no messy "recreating my customizations" process.
Theme updates
In order to add new functionalities, to stay up to date with the WordPress software evolution, to correct bugs, Lavilla theme is regularly updated.
Notifications of an update release
- At the time of the purchase, you were offered the option to be notified per email of any new release. If you opted in, you will receive an email each time an update is released
- If you wish to change your notification preferences (opt-in or opt-out), feel free to email us via the contact page here.
Update your theme
If you want to update your theme, follow these instructions:
- Download the theme again from our Downloads page.
-
Backup your website!
This is not compulsory but periodically backing up your entire installation (entire directory structure + database) is a good idea, especially before making any type of update to themes, plugins, core files, etc. Learn more about backups here. -
Upload the updated theme
- Rename the existing Lavilla/ folder which is in the wp-content/themes/ folder in something like Lavilla_before_update_to_version_2 (so the previous version is saved in case something goes wrong).
- Simply follow the standard FTP Installation instructions to upload the new theme to the wp-content/themes/ folder.
Theme licence validation
You received a Purchase code in the purchase confirmation email sent from sales@maestrel.com. If you can't find it, feel free to email us via the contact page here.
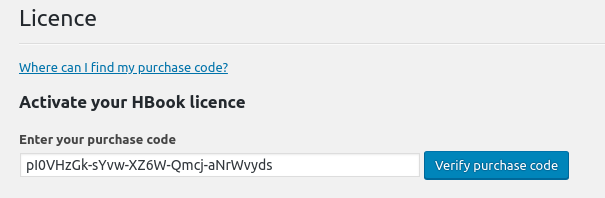
In Lavilla > Licence, you will enter your Purchase code to validate your licence.
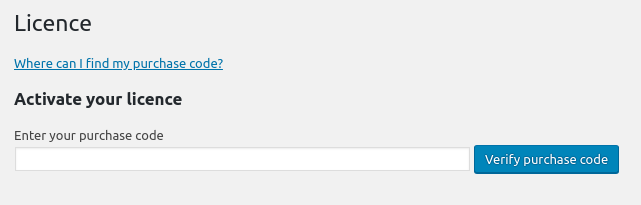
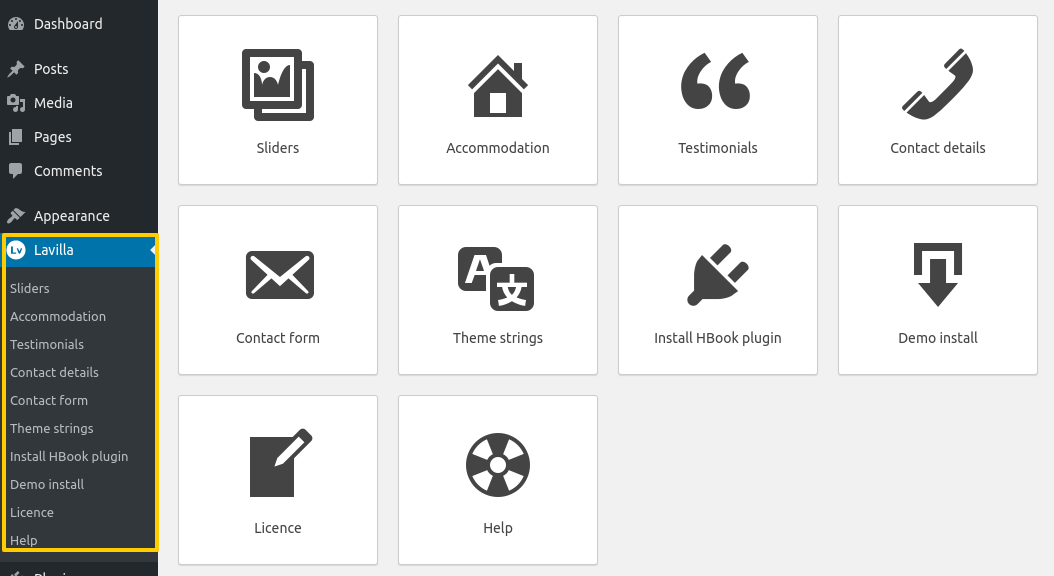
When your licence is validated, you will see that all Lavilla menus are unlocked:
HBook plugin installation
Lavilla theme comes with HBook as as standalone plugin. You can access HBook documentation here.
Installation and activation are easy and quick. Follow the steps below:
- Go to Lavilla > Install HBook Plugin
- Click on Install under "HBook plugin" label
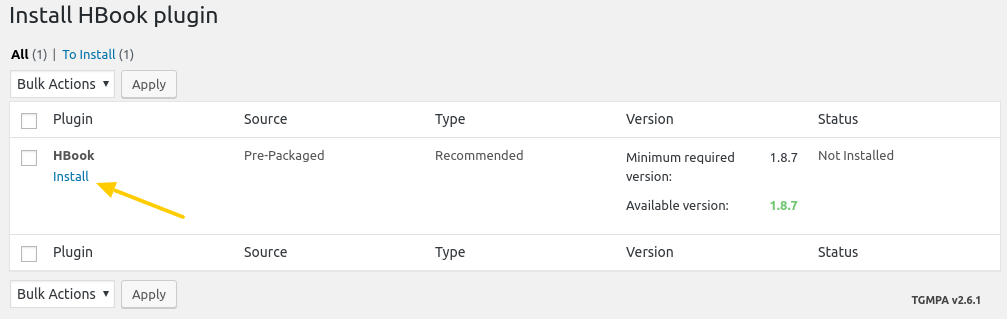
- Wait until the plugin is installed and activated.
HBook licence validation
You will use your Purchase code to unlock as well HBook menus. You can find this purchase code in the purchase confirmation email sent from sales@maestrel.com. If you can't find it, feel free to email us via the contact page here.
In HBook > Licence, you will enter your Purchase code to validate your licence.
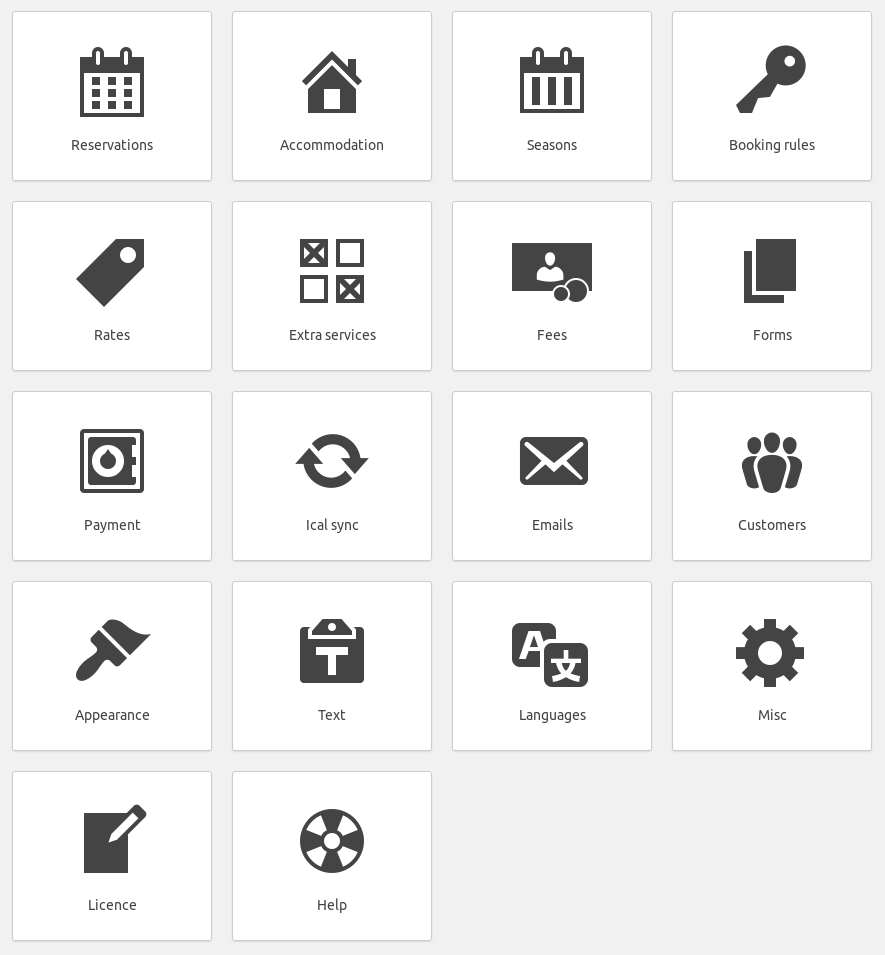
When your licence is validated, you will see that all HBook menus are unlocked:
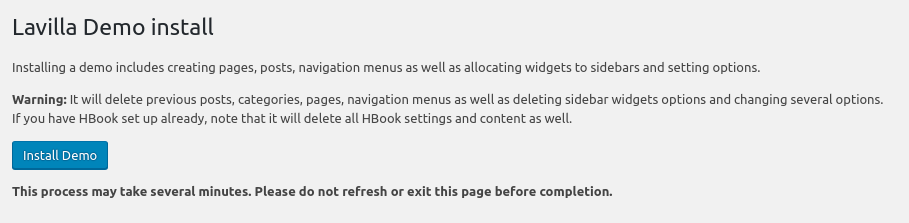
Demo Content Installation
You might find it handy to use the Demo site as a starting point to create your site. We have made it easy!
In Lavilla > Demo install, you will find our demo installer tool.
To load the content and options of the Demo, follow the instructions below:
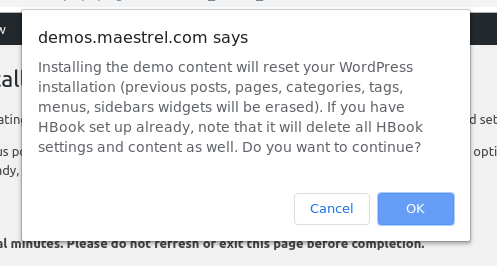
- Click on Install demo
- A pop-up window will open, asking you to confirm. Click OK to confirm.
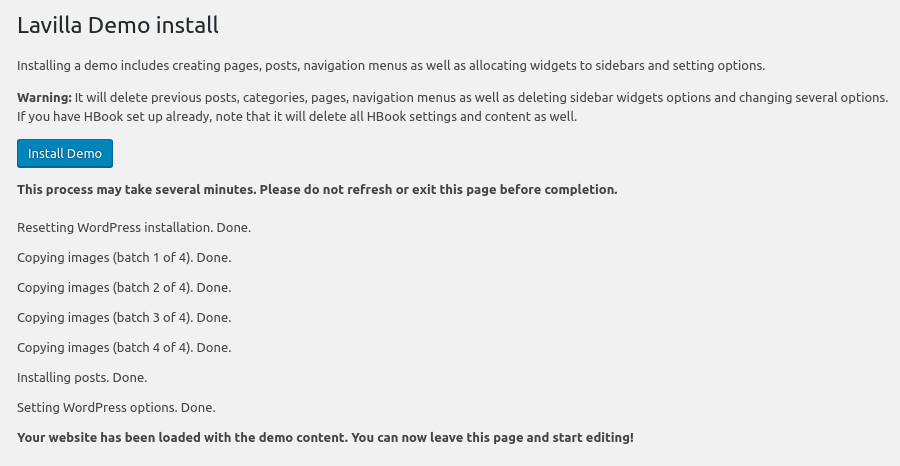
- The installation can take several minutes. When it is done, a message will appear.
Booking system
The booking system that is included in Lavilla theme is our own booking system plugin, HBook.
You can find the documentation for HBook plugin here.
Page templates - Lavilla sections
This section of the documentation presents the different page templates and gives details about Lavilla sections
Lavilla offers 2 page templates:
- Default template: this is a full width one centered column template. With this template, you can use Lavilla sections and you can as well include a booking form within the hero.
- Page with sidebar: this is a page with a sidebar on the right
Lavilla theme comes with a a choice of sections that will allow you to build your pages easily by choosing and arranging different sections. It is a great tool for you to build a variety of pages with simplicity. Each sections comes with its own settings and they are described below.
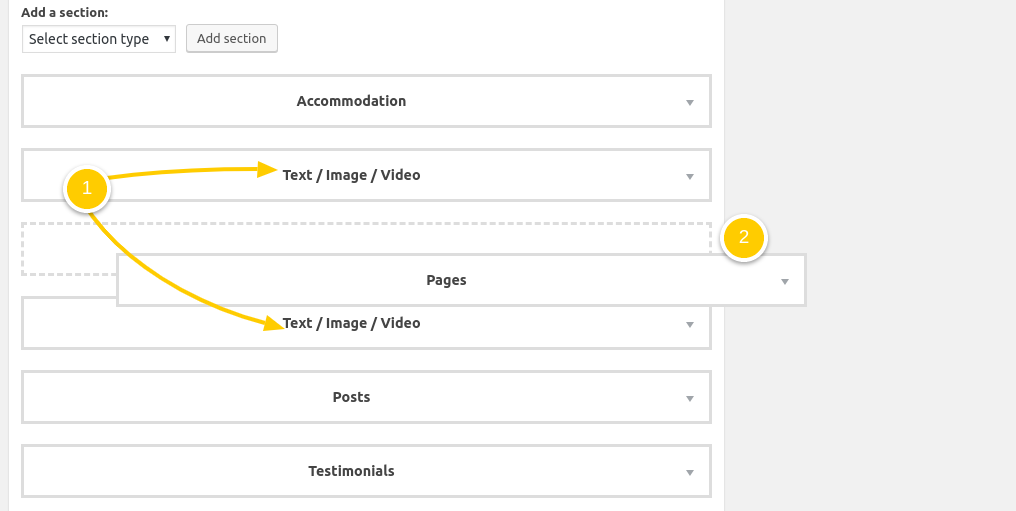
If you wish to use Lavilla sections in a page, simply set it in Page sections:
- Set that you wish to use Lavilla sections for this page
- You can select which sections you wish to add
- Here you can expand or collapse the section settings
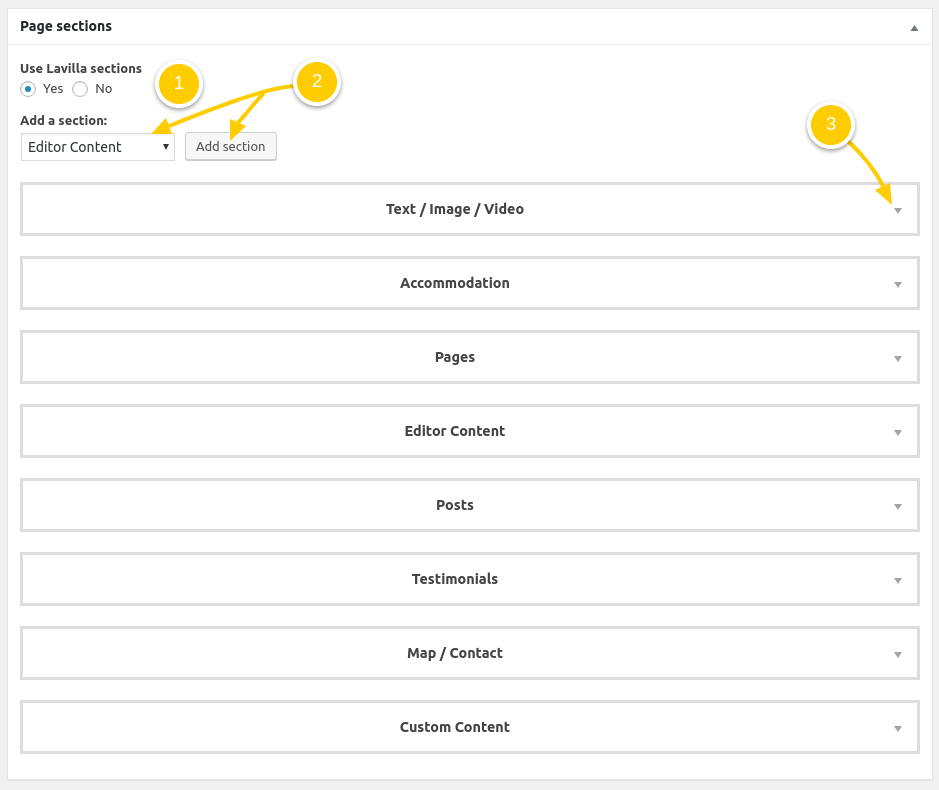
- You can use several times a same section type.
- You can re-order the sections to your taste by dragging and dropping.
The different sections you can pick from are as follow:
- Pages
- Accommodation
- Text + Image/Video
- Testimonials
- Posts
- Gallery
- Map / Contact
- Custom content
- Editor content
Pages
This section is a 2 or 3-columns section, which can be used to display different information contained in Pages.

- Add a tagline for the section
- Add a title for the section
- Select if you wish to shift the content up which means that part of the content will be displayed with the background of the previous section.
- Enter the ids of the pages you wish to display
- You can choose between 3 layouts:
- diamond: 3 columns layout on desktop, with the featured image in a diamond shape
- basic: 3 columns layout on desktop with classic featured image design
- alternate: 2 columns layout on desktop with alternance left/right
- Select which pages you wish to display
- Select if you wish to display the content of the page or the excerpt
- Select if you wish to display a button Learn more
- Select if you wish that the title include a link or not. The link can redirect to the page or show the image full-size.
- Decide if you with to show this section with a colored background or not
- If you set the above to "No", you can set a background image for that section
Accommodation section
This section allows you to display your accommodation types. The featured image, along with the title and the hero tagline of the Accommodation type post.
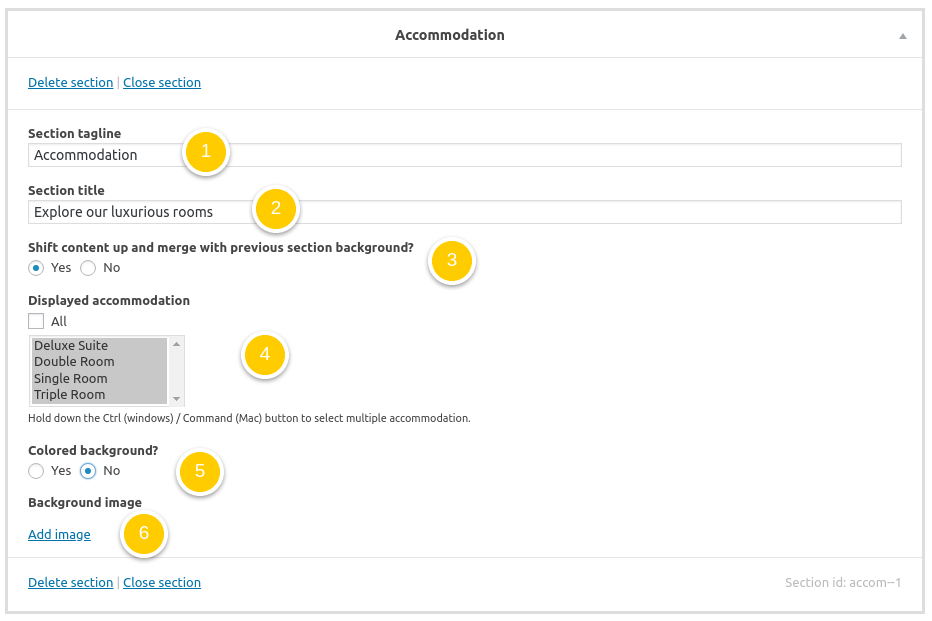
- Add a tagline for the section
- Add a title for the section
- Select if you wish to shift the content up which means that part of the content will be displayed with the background of the previous section.
- Select the accommodation types you wish to feature
- Decide if you with to show this section with a colored background or not
- If you set the above to "No", you can set a background image for that section
Text + Image/Video
This section is a two colomns layout on desktop. It is built with a text area on the left column and you can have either an image or a YouTube video on the right column.
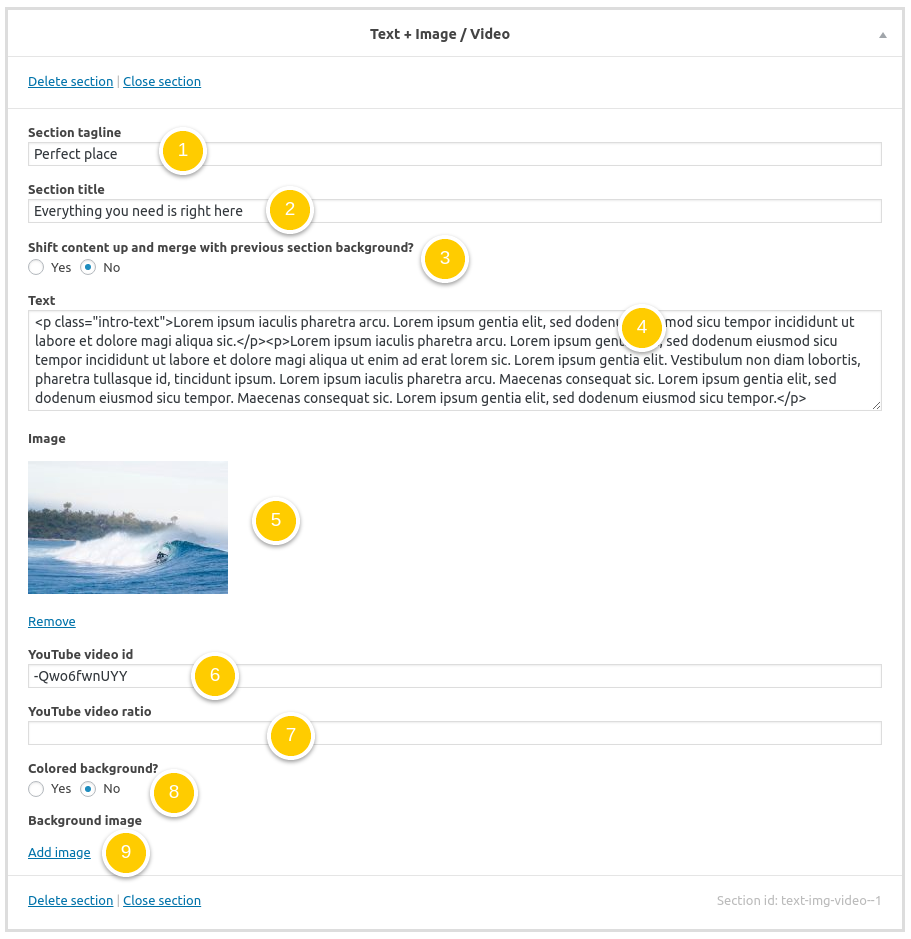
- Add a tagline for the section
- Add a title for the section
- Select if you wish to shift the content up which means that part of the content will be displayed with the background of the previous section.
- Enter your text
- Add an image : it will be displayed either as an image or used as the background image of the video
- If you wish to show a video, enter the YouTube video id
- Enter a ratio for the video (example: 16/9, 3/2, etc...)
- Decide if you with to show this section with a colored background or not
- If you set the above to "No", you can set a background image for that section
Testimonials
This section is aimed at displaying testimonials. It has different layout and navigation options.
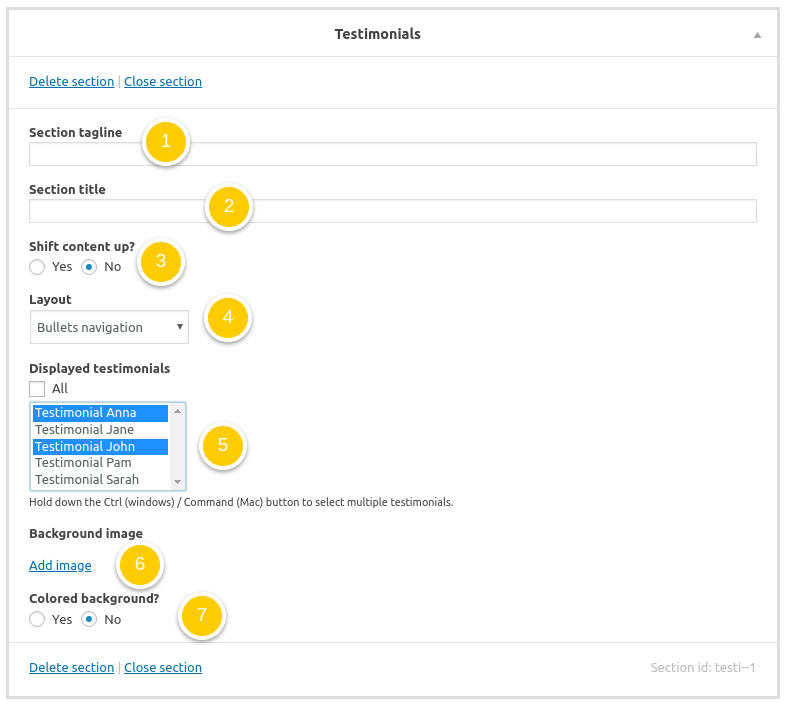
- Add a tagline for the section
- Add a title for the section
- Select if you wish to shift the content up which means that part of the content will be displayed with the background of the previous section.
- Select the layout for the navigation between testimonials: it can be with bullets or thumbnail
- Choose which testimonials you wish to feature
- Decide if you with to show this section with a colored background or not
- If you set the above to "No", you can set a background image for that section
Posts
This section is a three columns layout on desktop to dislplay a list of your last posts: it will show the featured image, the excerpt and a "Read more" button to go to the post.

- Add a tagline for the section
- Add a title for the section
- Select if you wish to shift the content up which means that part of the content will be displayed with the background of the previous section.
- Enter the number of posts to be displayed.
- Choose which category/categories of posts you wish to be displayed
- Decide if you with to show this section with a colored background or not
- If you set the above to "No", you can set a background image for that section
Gallery
This section allows you to display a gallery of images with an introduction text.
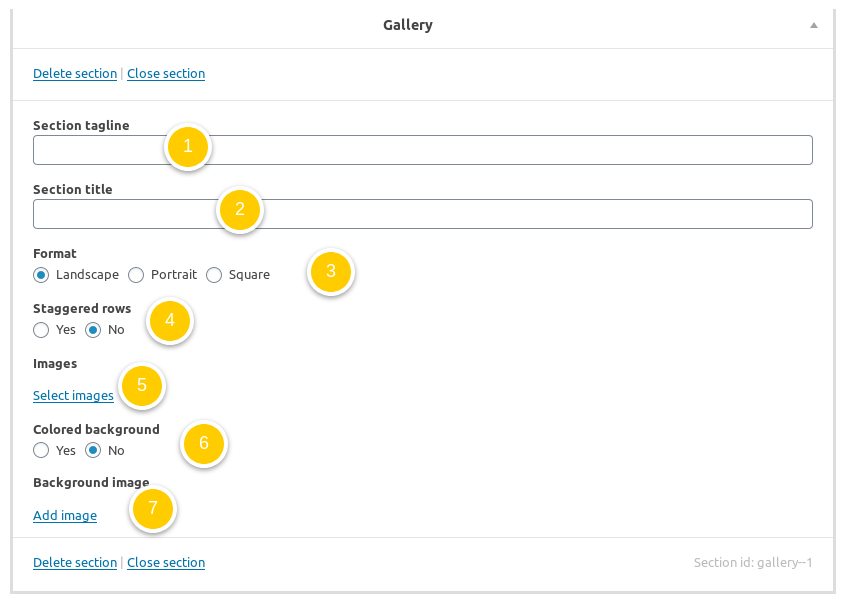
- Add a tagline for the section
- Add a title for the section
- Select the layout: landscape, portrait or square.
- Select if you wish to use staggered rows here
- Select the images for the gallery section
- Decide if you with to show this section with a colored background or not
- If you set the above to "No", you can set a background image for that section
Map / Contact
In order to display maps on your website, you need to :
- get a Google API key. Please refer to this page: Get API Key
- enter the Google API key in Appearance > Customize > Map. Please check this section of Adomus documentation.
This section is a one or two-columns section that can display a contact form, a map or/and contact information. The layout options are:
- contact form and a map
- contact information and map
- contact information and contact form
- a contact form only
- a full-width map
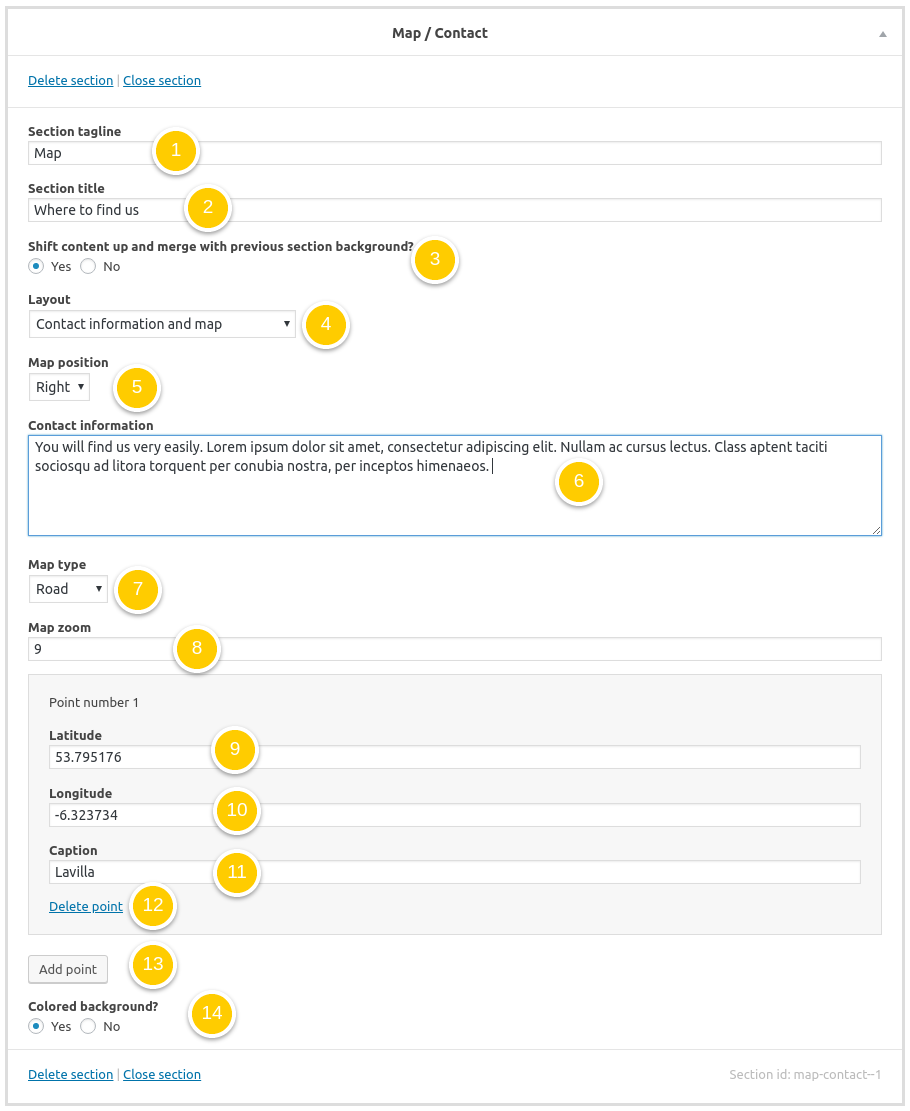
- Add a tagline for the section
- Add a title for the section
- Select if you wish to shift the content up which means that part of the content will be displayed with the background of the previous section.
- Select the layout
- Select the positionof an element (Map, Contact) depending on the layout chosen
- Enter here your contact information (if selected in the layout)
- Select the type of map to display
- Add the zoom for the map
- Enter here the latitude of the first point
- Enter here the longitude of the first point
- Add the caption text
- Click here to add another point and proceed the same way
- Click here to delete a point for the map
- Decide if you with to show this section with a colored background or not
- If you set the above to "No", you can set a background image for that section
Editor content section
If you wish to display the content of the default editor of the current page or of any other page/post, use this section.
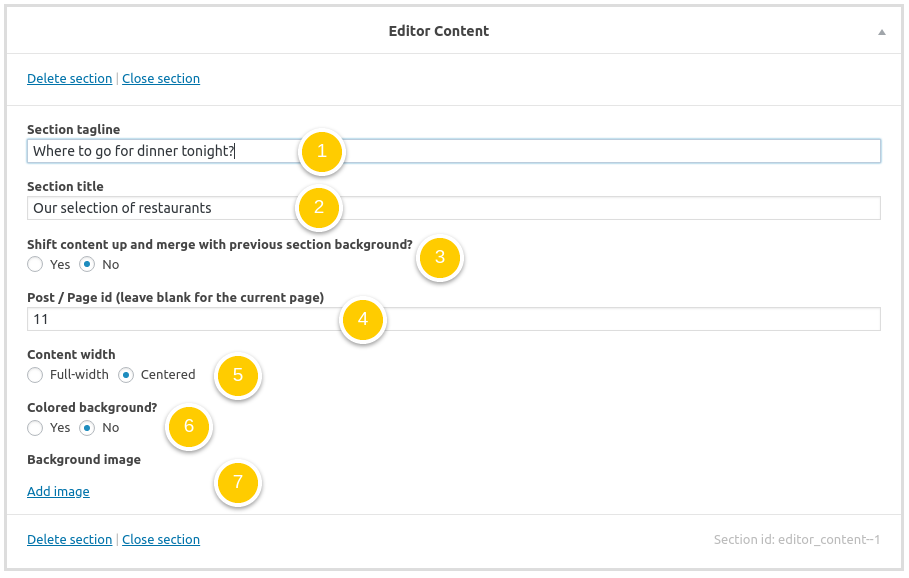
- Add a tagline for the section
- Add a title for the section
- Select if you wish to shift the content up which means that part of the content will be displayed with the background of the previous section.
- Set if you wish to use the content of another post/page that you wish to include here. In that case, you will add the id of the post/page.
- Set if you wish a centered or full-width layout
- Decide if you with to show this section with a colored background or not
- If you set the above to "No", you can set a background image for that section
Custom content section
If you wish to display custom content, use the editor of this custom content section.
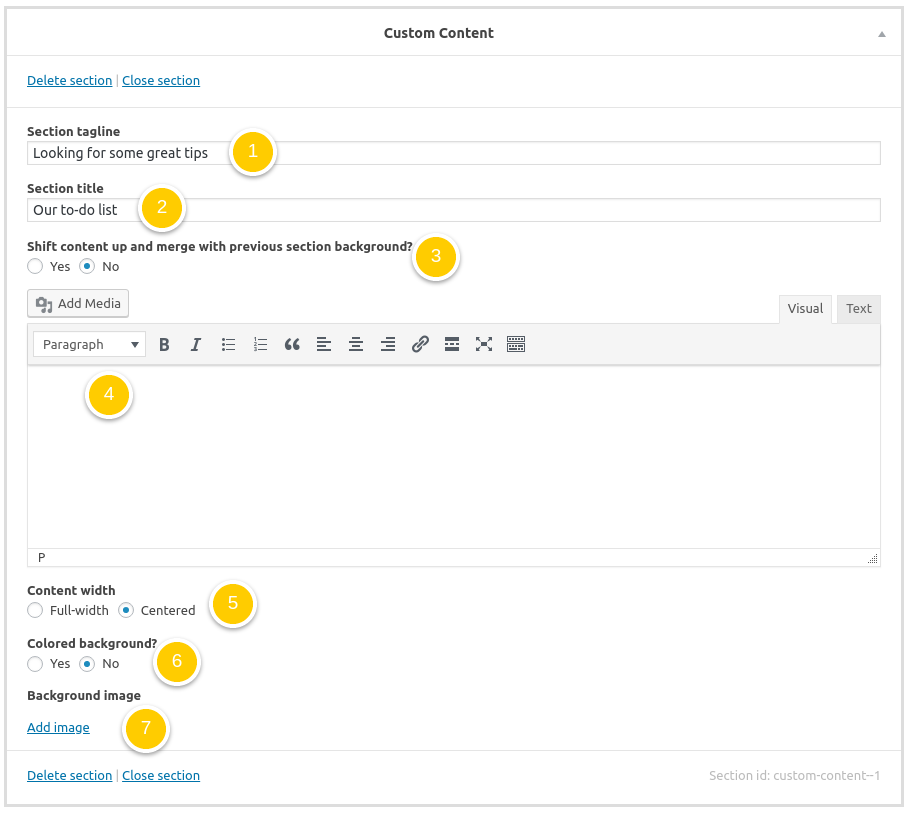
- Add a tagline for the section
- Add a title for the section
- Select if you wish to shift the content up which means that part of the content will be displayed with the background of the previous section.
- Add your custom content here
- Set if you wish a centered or full-width layout
- Decide if you with to show this section with a colored background or not
- If you set the above to "No", you can set a background image for that section
Hero options
This section of the documentation presents the different options Lavilla offers for the hero.
It deals as well with hero booking form options.
- You can choose from the following hero types:
- an image
- a slider
- a title only
- a custom hero
-
Post and pages have a section where you can set your hero options.
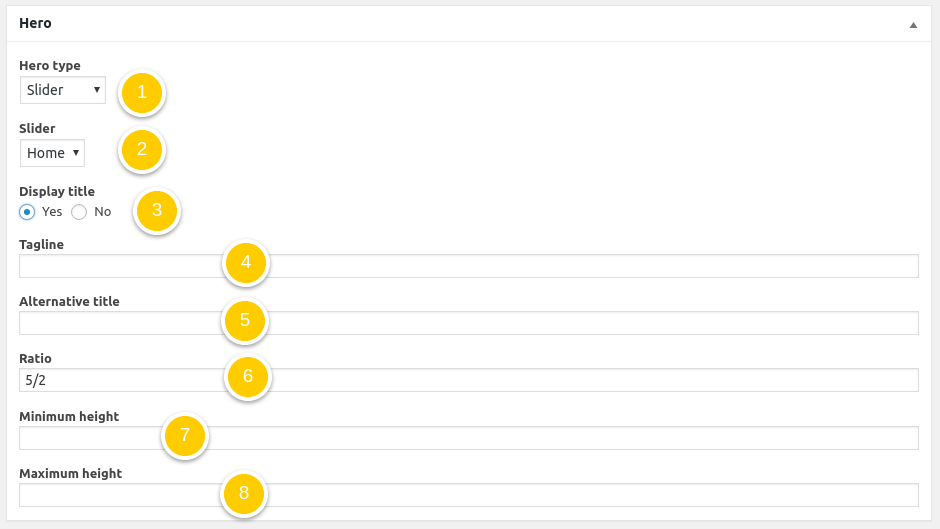
- Select the type of hero: image, slider, title or custom
- Choose if you wish to display the hero full screen or not
- Choose if you wish to display the title of the post/page
- You can add a tagline
- You can add an alternative title to be displayed instead of the post/page title
- Enter a ratio (example: 16/9, 3/2, etc...)
- Enter a minimum height for the hero
- Enter a maximum height for the hero
An image as a hero
If you wish to have an image as hero, you can either use the featured image or another image.
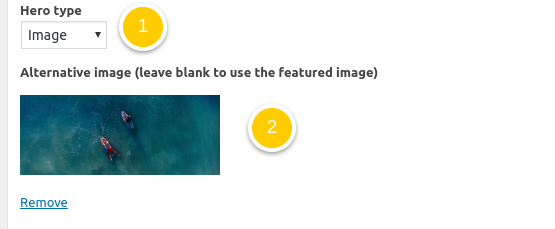
- If you wish to use the featured image, you do not have to change anything
- If you wish to use another image, click on Add image to open the media library
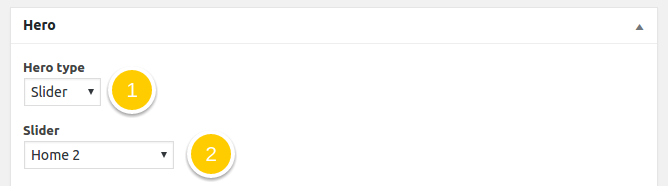
A slider as a hero
If you choose to have a slider as a hero, just select which slider you wish to have.
A custom hero
You can choose to have a custom slider ; you will enter a shortcode to be executed.

Hero booking foom
- With the default template you can have a booking form in the hero.
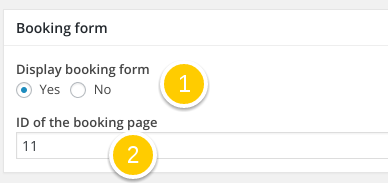
- Indicate if you wish to display a booking form
- Enter the id of the main booking page.
Sliders
You can manage Sliders in the menu Lavilla > Sliders
- The Sliders page is straightforward:
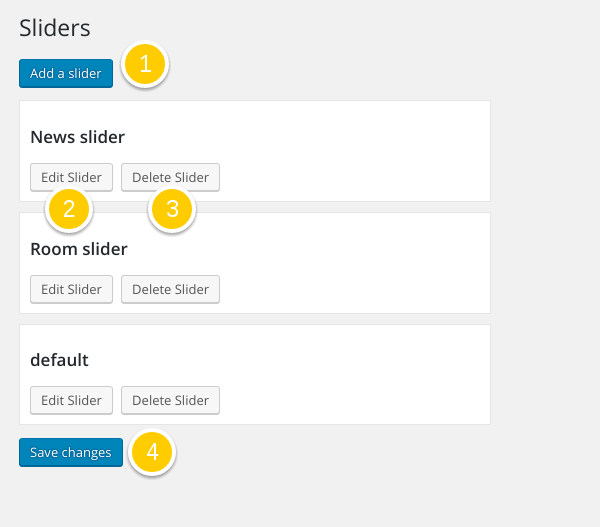
- Click Add a Slider to create a new slider
- Click Edit Slider to edit a slider
- Click Delete Slider to delete a slider
- Do not forget to Save all your changes
- Each slider has the following settings:
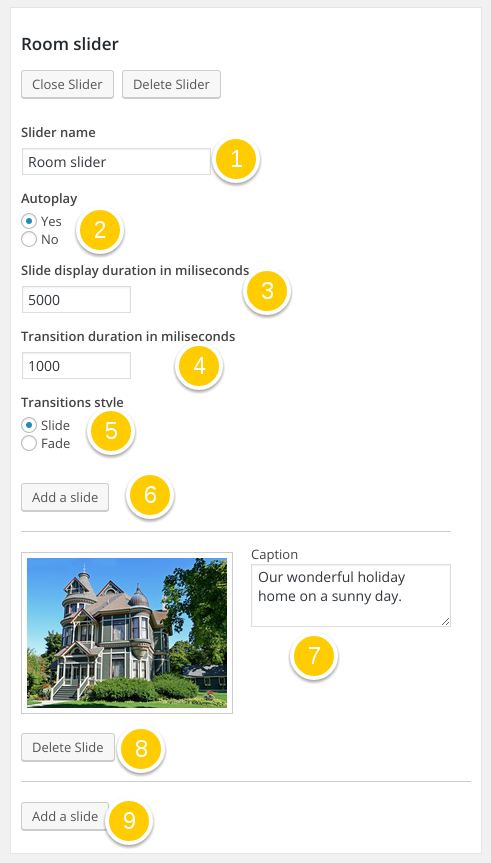
- Enter the name of the slider
- Set if you wish the slider to autoplay
- Set the duration of the display of each slide (in miliseconds)
- Set the duration of the transition between slides (in miliseconds)
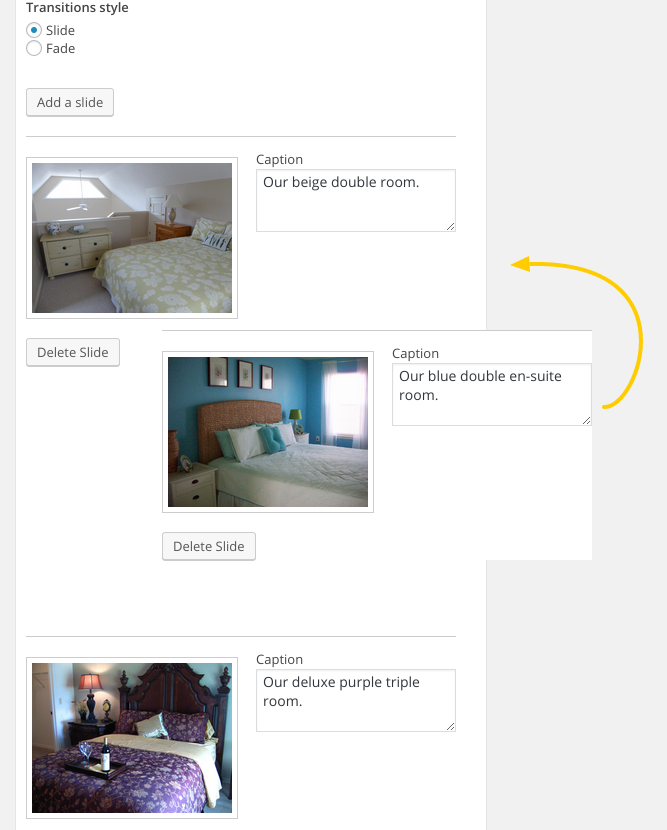
- Choose the transition style
- Click this button to add a slide before the first slide
- Add a caption to the slide
- Click this button to delete the slide
- Click this button to add a slide after the last slide
You can re-order slides by dragging and dropping.
Testimonials
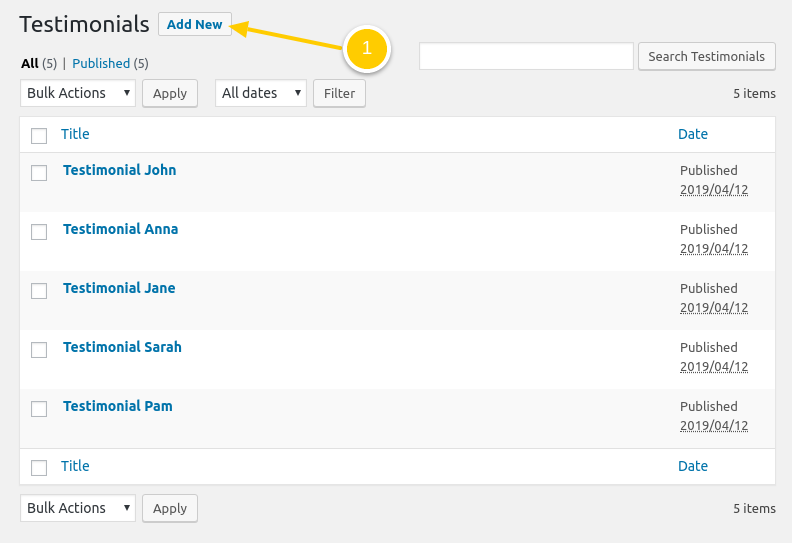
You can add testimonials in the menu Lavilla > Testimonials
-
If you want to add a testimonial, follow the instructions below:
- Click Add New.
- Fill in the new testimonial post:
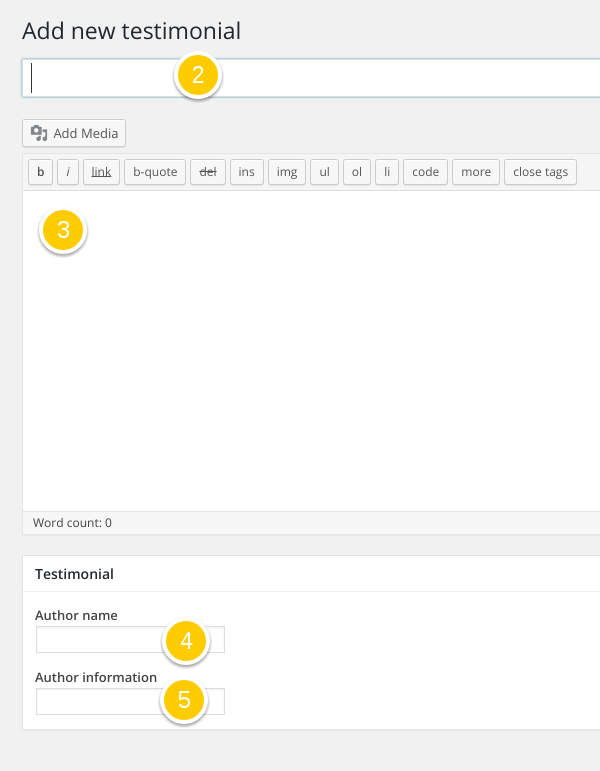
- Enter a title for your testimonial
- Use the editor to enter the content
- Enter the author's name
- Enter the author's location
- You can add a featured image and it will be used as a thumbnail
- Don't forget to Publish!
- Click Add New.
Contact
In this section of the documentation, you will find information regarding the display of:
Contact details
In the menu Lavilla > Contact details, you will be able to set your contact details information (phone, email, etc...).
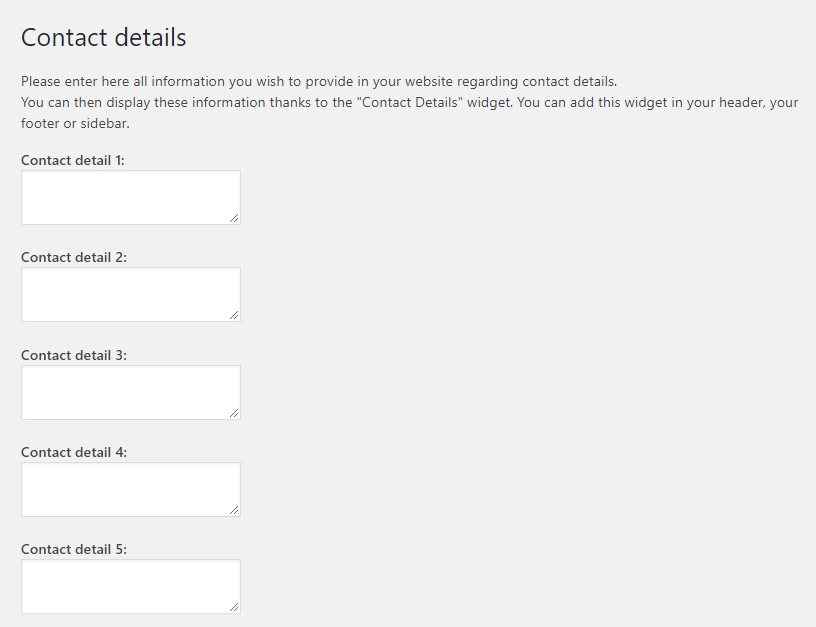
In Appearance > Widgets,
you can add the widget "Contact Details". It means that you can add contact information in the header, footer or sidebars.

Contact form
In the menu Lavilla > Contact Form, you will be able to build your contact form and to define the email settings.
This information will be used:
- when you display a contact form with the section Contact / Map section
- when you use the [hb_contact_form] shortcode which allows you to display a contact form anywhere on your site.
Form builder
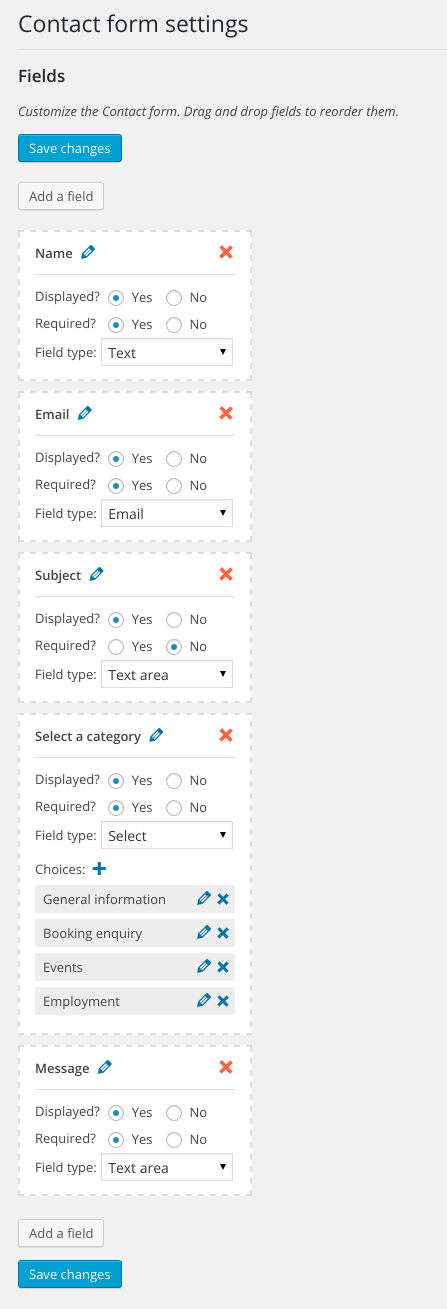
- Add any type of field: Text, Email, Number, Text area, Select, Radio Buttons, Check Boxes, Title, Explanation.
- Items can be reordered by dragging and dropping them
Privacy policy, Terms and conditions
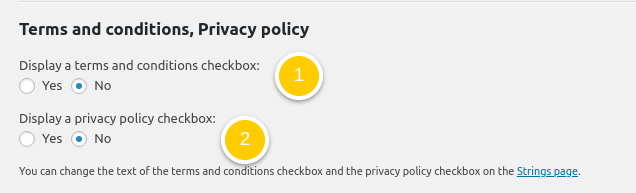
- You can set if you wish to display a Terms and conditions checkbox.
- You can set if you wish to display a Privacy policy checkbox.
Email settings
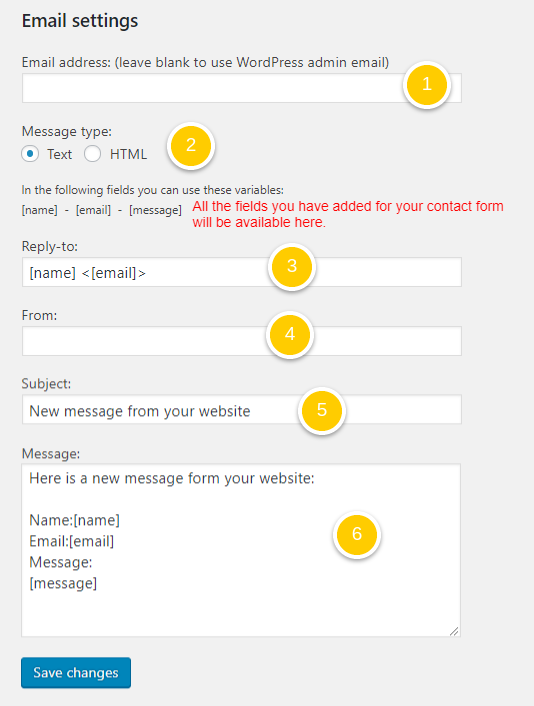
- Indicate here your email address so you receive an email with the message sent by the cutomer with your contact form.
- Set if you wish to send as HTML (i.e your email body is written in html) or text
For each of the field used to build your contact form, you will find a corresponding variable ( ex: [contact_name] ). You can use them in all fields below.
- Indicate the Reply-to: you can use the variables for the customer email and name. If you leave it empty, it will use the "From" as recipient when you will reply to the email.
- Indicate the From: here you can as well use variables for the customer email and name. If you leave it empty, it will be sent from the WordPress admin email adress.
- Indicate the Subject: here you can use any variables listed
- Add the content of your message
Customizer
You can access to the customizer from the menu Appearance->Customize. The customizer has different sections:
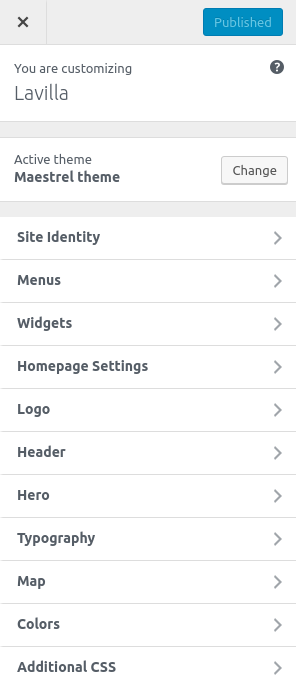
- Site identity, Menus, Widgets, Homepage settings, Additional CSS are not specific to Lavilla theme
- Logo, Header, Hero, Typography, Map and Colors are explained below
Logo
In this section of the customizer, you can add your logo:
![]()
- Select the image for your logo. Leave it empty if you wish to diplay your blog title.
- Choose the logo height
- Choose the small logo height that will be used in narrower devices
Header
In this section of the customizer, you can add your logo:
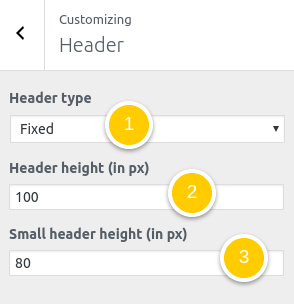
- Set the header height
- Set the small header height that will be used in narrower devices
Hero
In this section of the customizer, you can add your logo and set the default settings for the hero:
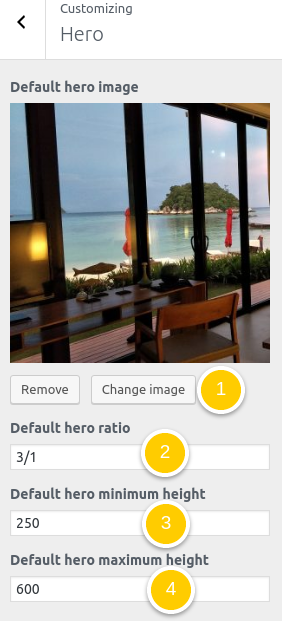
- Choose the default hero image
- Choose the default hero ratio: this is the ratio between width and height
- Choose the default hero minimum height : it means that the hero image will never be smaller than this height.
- Choose the default hero maximum height: it means that the hero image will never be bigger than this height
The following settings are here to help you adjust the responsiveness of the hero.
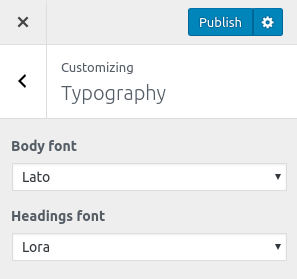
Typography
Here you can change the font for the headings and the body. It is pretty straightforward:
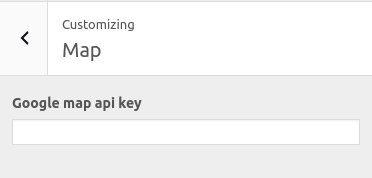
Map
This section allows you to enter the Google Map API key which is needed for the maps to be displayed.
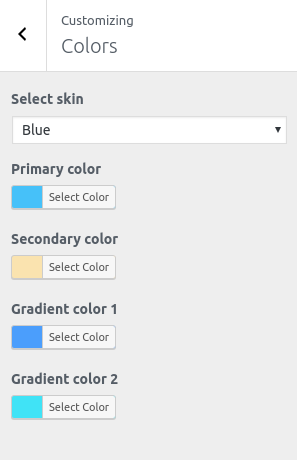
Colors
Here you can select a skin: blue or green. This will load our suggested color scheme. But you can change the primary color, the seconday color, the gradient color 1 and the the gradient color 2:
Widgets areas: header, footer, call to action, sidebars
In Appearance > Widgets , you will see :
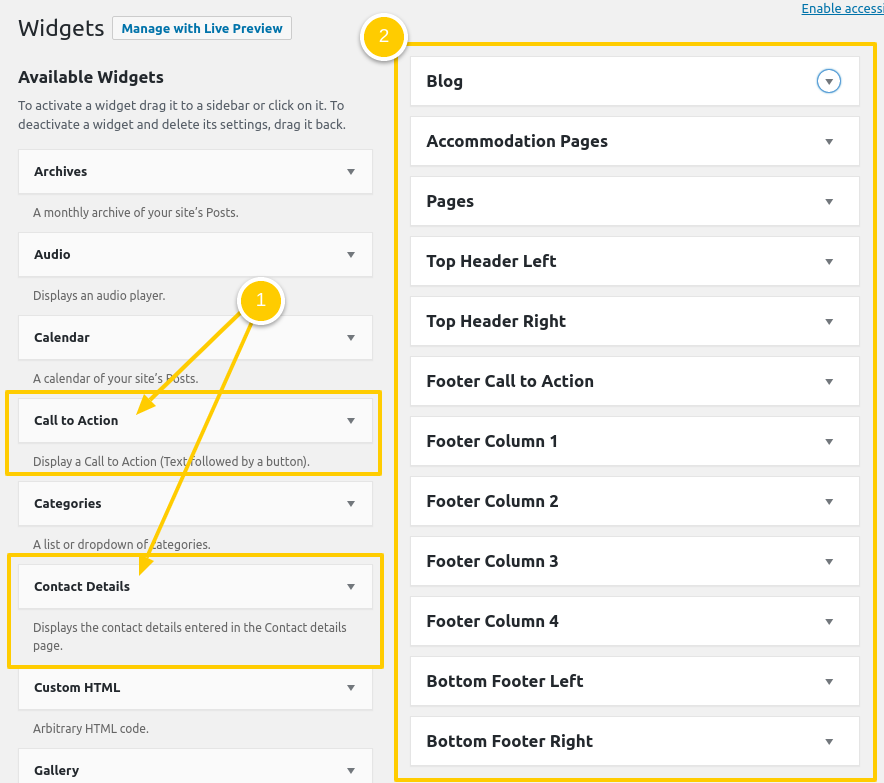
Lavilla widgets
Lavilla adds 2 new widgets to the list of available widgets:
- Contact details :
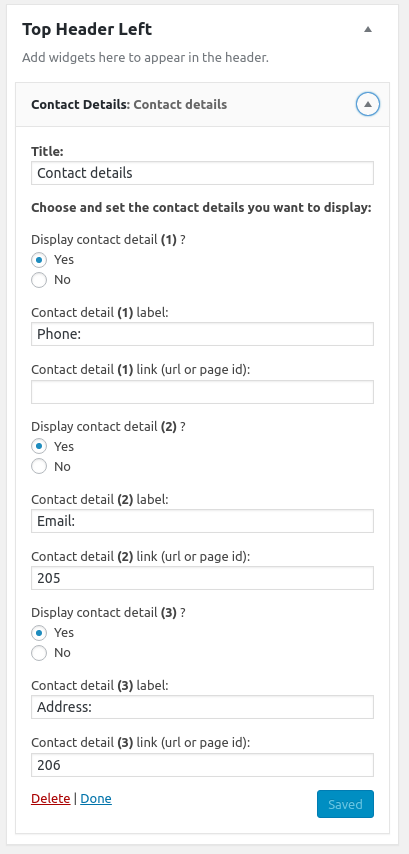
This widget will display some of the information set in Lavilla > Contact details. You can decide which information you wish to display and if you wish to link the text to a page.
For example, you may wish that a click on your postal address bring your visitor to a "Location/Directions" page or that clicking on the email redirects him to your "Contact" page, etc...
-
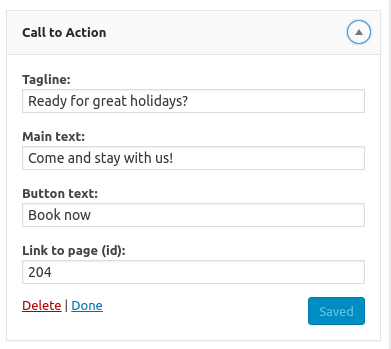
Call to action: it will display a text with tagline followed by a button.
Lavilla widgets
Lavilla add various areas where you can add widgets.
- Sidebars:
- Blog pages sidebar
- Accommodation pages sidebar
- Pages sidebar
- Top header: there are 2 areas - one on the top-left and another on the top-right corners
- Footer areas
- the footer call to action: this is a full-width display right above the footer columns
- the footer columns: these can be either 2, 3 or 4 columns
- the bottom footer: there are 2 areas below the footer columns - one on the bottom-left and another on the bottom-right corners
Strings customization and translations
In the menu Lavilla > Theme strings, you will be able to easily customize or translate all strings of Lavilla theme. If your website is in a different language than English or if you have a multi-language plugin, you will be able to translate each string in all languages.
Multi-language
In order to create a multi-language website you will need to use a multi-language plugin. There are several multi-language plugins available. Lavilla theme is compatible with WPML and Polylang.
Translate Accommodation pages with WPML
Once you have activated and configured WPML plugin you need to make the "Accommodation Custom posts" translatable.
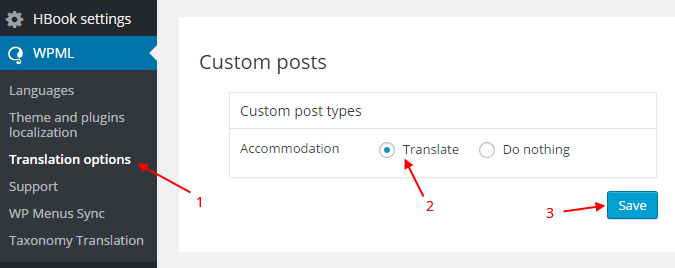
- Click Translation options
- Select Translate
- Click Save
You can now translate the Accommodation pages. Note that you don't have to enter the Accommodation settings in the translated page again (except the Description fields).
Translate Accommodation pages with Polylang
Once you have activated Polylang plugin you need to make the "Accommodation" translatable.

- Click Languages to access the Polylang setting page
- Check the Accommodation box
- Click Save Changes
You can now translate the Accommodation pages. Note that you don't have to enter the Accommodation settings in the translated page again (except the Description fields).
Theme translation
Lavilla theme follows the standards of WordPress internationalization. Below are instructions on how to translate Lavilla theme with Poedit.
- Download and install Poedit
- Open the Lavilla/languages/default.pot file in Poedit
- Create your .po and .mo files by going to File -> Save as...: choose the wp-content/themes/Lavilla/languages/ folder and add the correct locale to name the file name (for example for a French translation: fr_FR.po)
- Translate the strings you will use on your website
- Save again to update the .po and .mo files